Low floor high ceiling tasks-Investigations with Pentominoes
Hit the ground running!


Beginning with this issue, we start a new series which is a compilation of ‘Low Floor High Ceiling’ activities. What does this term mean? I first encountered it at a Cambridge workshop by Charlie Gilderdale and the concept appealed instantly. The name describes it perfectly: an activity is chosen which starts by assigning simple age-appropriate tasks which can be attempted by all the students in the classroom. The complexity of the tasks builds up as the activity proceeds so that each student is pushed to his or her maximum as they attempt their work. There is enough work for all but as the level gets higher, fewer students are able to complete the tasks. The point however, is that all students are engaged and all of them are able to accomplish at least a part of the whole task.
I was recently asked how I handled differentiated teaching in the classroom. The very act of reaching out to academically weak students seems to defeat the purpose as being singled out for such attention sends their already shaky confidence nose-diving to new lows. After many such attempts, I realised that my efforts needed to be much more subtle and should have as a primary objective ways in which to increase the student’s confidence. I found ‘Low Floor High Ceiling’ tasks a great way to deliver differentiated instruction subtly. Since the task starts off fairly simply, the initial levels can be attempted successfully by all the students in the class. The more able students sail through these levels but the greater advantage is that even the less able students are able to get a start on the problem. This boosts their confidence and sustains their interest. As the task proceeds, the challenge level increases. But the earlier steps provide the scaffolding that can help students attempt these levels.
There is also opportunity for students to make conjectures based on observations and even prove these conjectures if they are motivated enough.
Teachers may find the development of such tasks rather challenging but a good collection will prove invaluable. Jo Boaler’s youCubed has started putting together a series of such math tasks which you can access at http://youcubed.stanford.edu/tasks/.
We hope to augment this collection with a new activity in each issue. We have tried to build mathematical skills in the activity, designing it so that students can observe, make conjectures and even prove these if they are motivated enough. We start with the Pentomino Kit which was featured in the July 2014 issue. If you haven’t done so already, we strongly advise you to read this article (also available on read this article.)
Each card (or set of cards) is a task which features a series of questions which build up in complexity.
To get you started, think of a monomino as a unit square.
TASK 1
Let’s start at the very beginning…
- What is a monomino? Show how many there can be.
- What is a domino? Show how many dominoes there can be.
- What is a tromino? Show how many trominoes there can be.
- What is a tetromino? Show how many tetrominoes there can be.
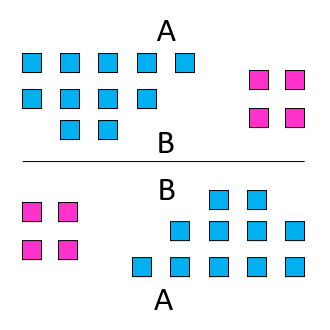
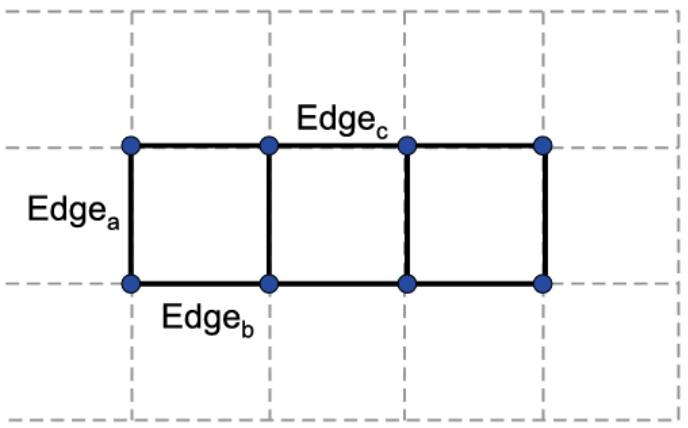
- Is there a way to identify unique edges of an n-omino to which unit squares can be attached?
- Using this, can you count how many n+1-ominoes will be formed?
- So how many pentominoes are there?
Teacher’s Note: Some edges of this tromino have been labelled. Attaching a unit square to any one of these edges will give you a different tetromino. A systematic labelling or colouring of the edges of an n-omino will help students arrive at all possible (n+1)-ominoes. Students can also draw a tree diagram of this process. Interestingly, the branches of the tree will start intersecting since different n-ominoes can generate the same (n+1)-omino!
At this point if you want to make a pentomino kit, here is a quick and easy method.
- Take a sheet of thick brown cardboard and cut a 5 inch by 12 inch piece
- Make a 5 x 12 grid of 1 inch squares on it.
- Use the following template for the pentominoes kit
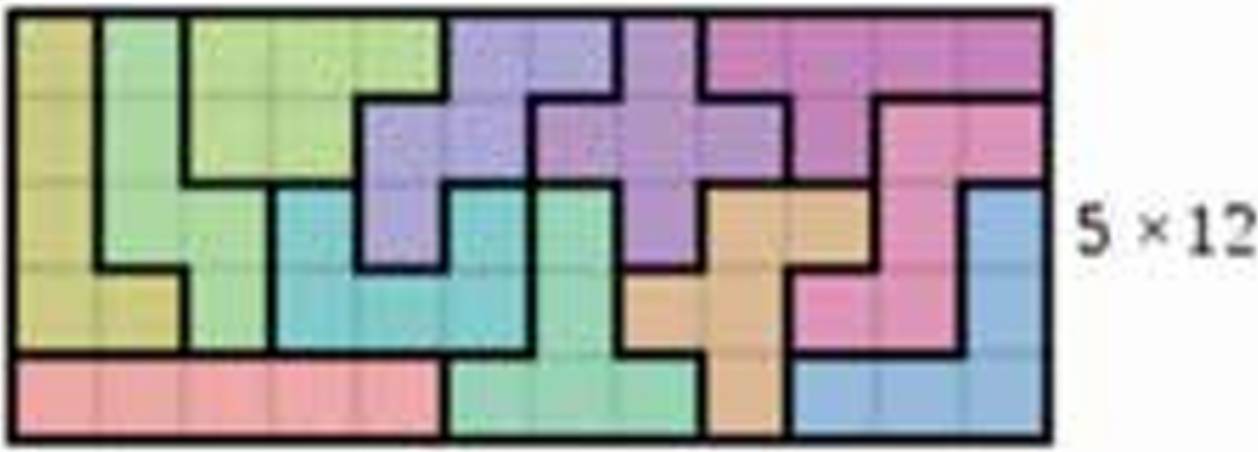
- Cut out the shapes.
- Colour each shape.
TASK 2
Now that you have the shapes in hand, you can study various features of each pentomino and classify them.
Classification based on convex and non-convex
- Which of the pentominoes are convex?
- Which are non-convex?
- How are the factors of 5 related to this result?
- Can you confirm this finding with the tetrominoes?

Teacher’s Note: The convex n-ominoes will be rectangles. Since 5 is prime, the only possible rectangle is the 5×1 rectangle. Students can note that there will be more than one convex tetromino since 4 is not a prime.
TASK 3
Classification based on symmetry
- Which pentominoes need to be coloured only on one side? Why?
- How many lines of symmetry do each of the “one-sided” pentominoes have?
- Look closely at those with more than one line of symmetry.
Do they have any other kind of symmetry as well? What symmetry is that, if any?
- Do any of the “double sided” pieces have rotational symmetry?
- Comment on the order of rotational symmetry and the number of lines of symmetry for each of these pentominoes.
Teacher’s Note: Any shape with more than one line of symmetry must have rotational symmetry as well. And the converse, any shape with both rotational and line symmetry must have at least 2 lines of symmetry. Both can be proved quite simply. There is a relation: minimum angle between 2 lines of symmetry = ½ × minimum angle of rotation. Students may find it helpful to fill in the following table and then conjecture on the relationship between linear and rotational symmetry.
| Linear symmetry | |||
|---|---|---|---|
| Yes | No | ||
| Rotational symmetry | Yes | ||
| No | |||
TASK 4
| Name of Piece | Perimeter of piece | Number of lines separating squares in each piece |
|---|---|---|
| F | ||
| I | ||
| L | ||
| N | ||
| P | ||
| T | ||
| U | ||
| V | ||
| W | ||
| X | ||
| Y | ||
| Z |
Any connection between column two and column three?
Teacher’s Note: Pattern recognition while doing this task can lead students to the formula for the perimeter of a pentomino to be 20 − 2n, where n is the number of lines separating squares in each piece.
TASK 5
Enveloping rectangles
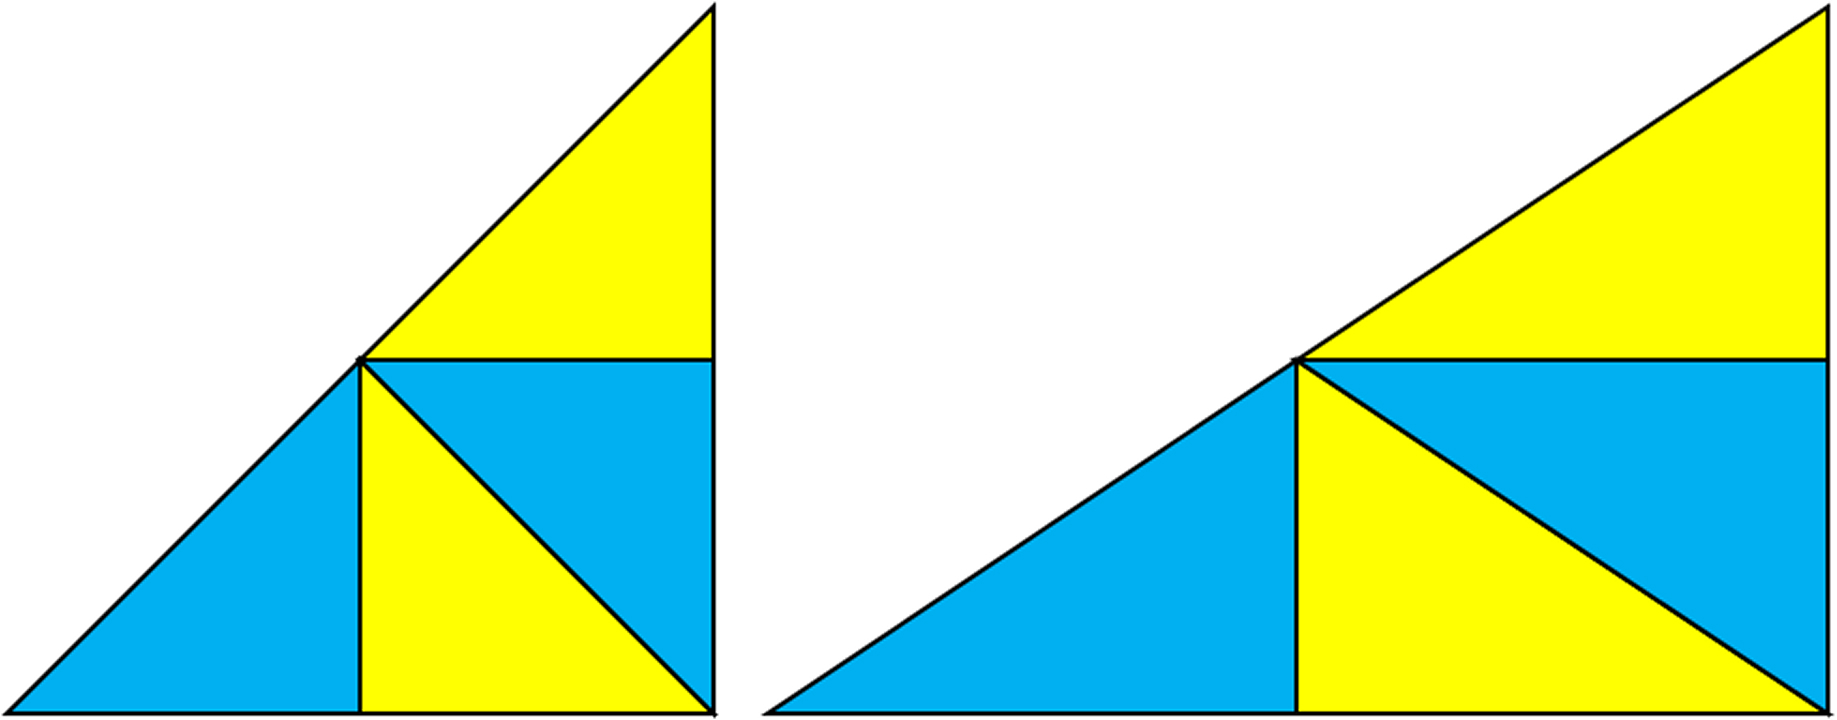
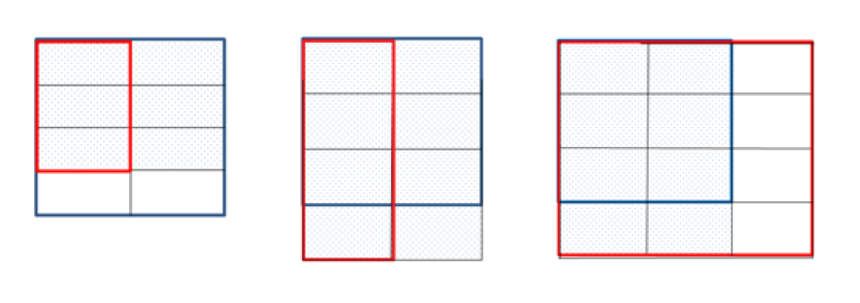
- Why are the perimeters different for the pentominoes enclosable in 2 × 3 rectangles?
- Is there any tetromino whose perimeter equals that of a pentomino? Note: area of any tetromino is 4 whereas that of any pentomino is 5.
- Look at all trominoes, tetrominoes and pentominoes:
- Any other possible pairs with same perimeter but different area?
- Why is the perimeter preserved?
- Any other possible pairs with same area but different perimeters? Why are the perimeters different?
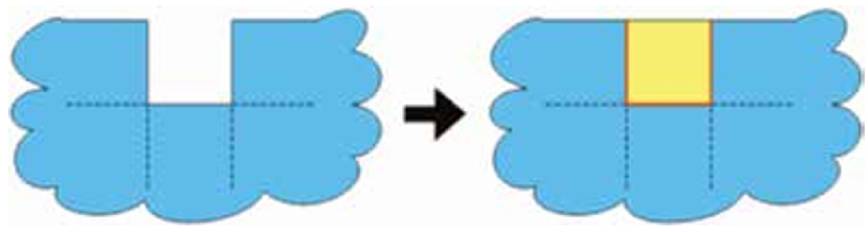
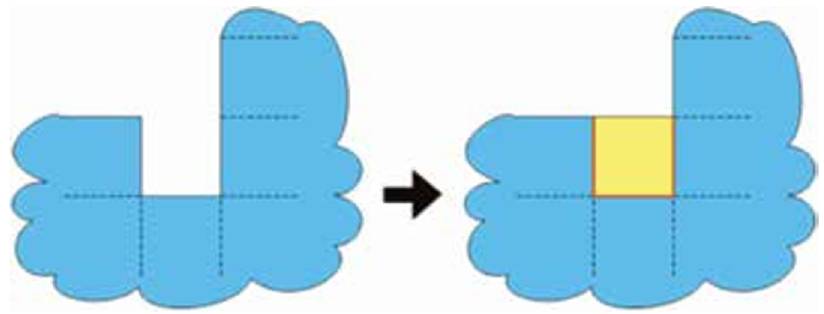
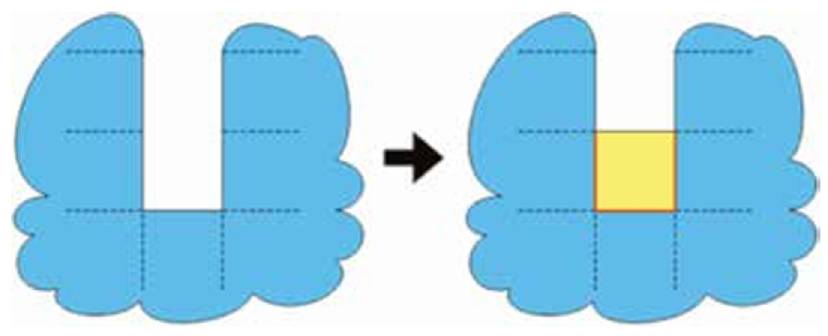
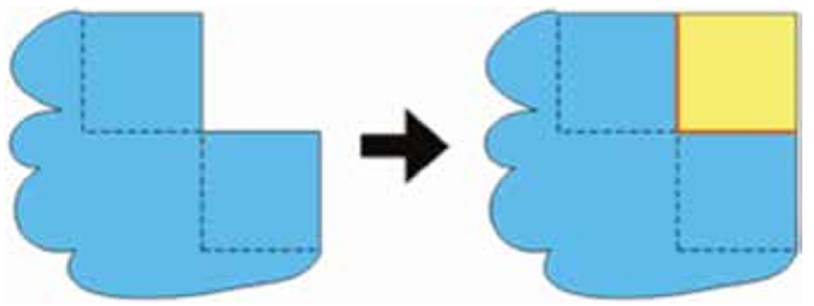
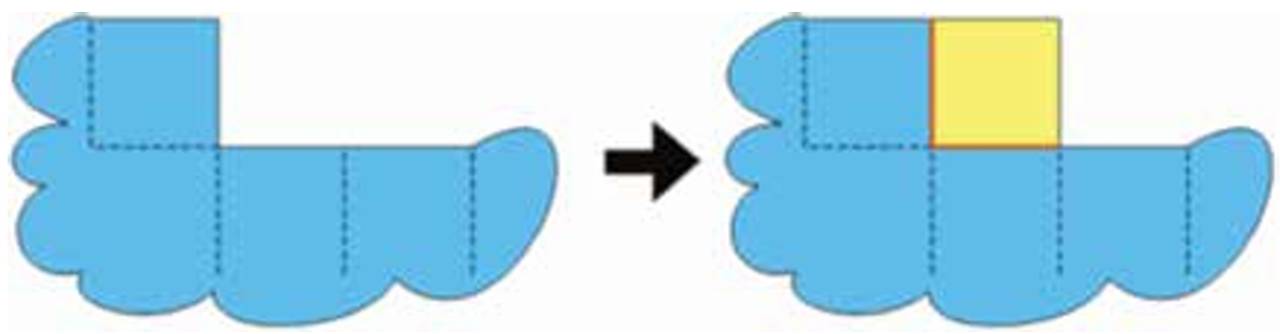
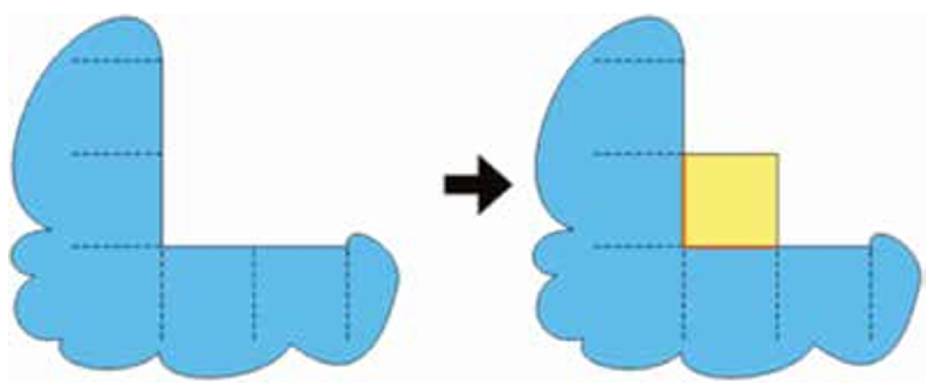
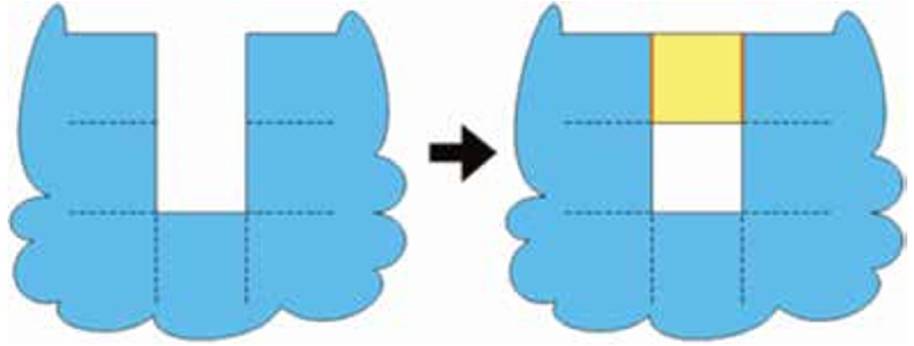
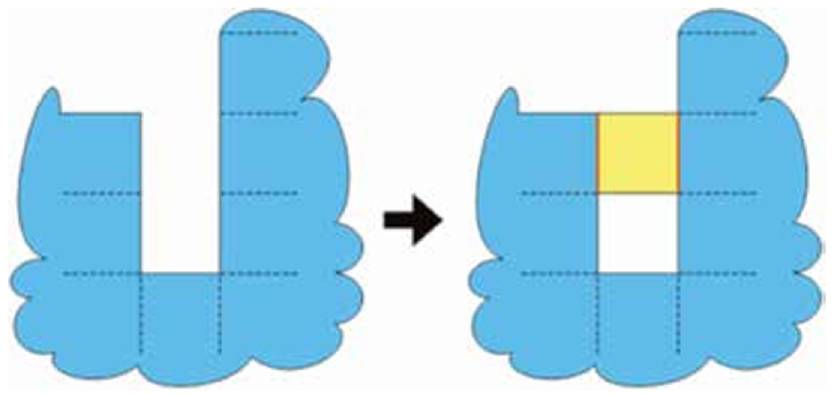
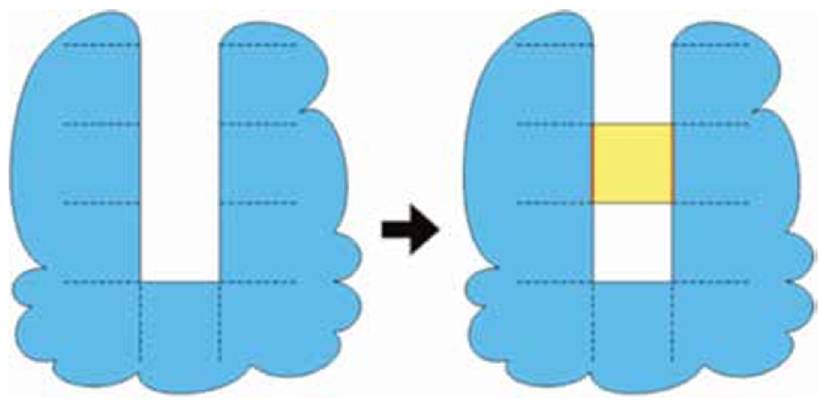
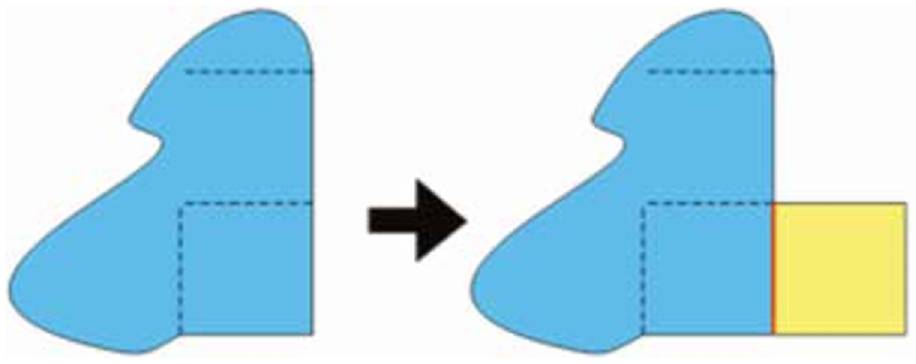
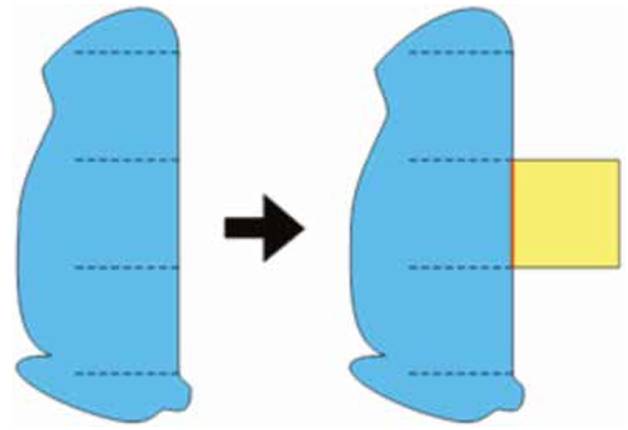
Teacher’s Note: Note that carving out an L from a corner does not change the perimeter, even when repeatedly performed. However, carving out a U increases the perimeter by 2 units.
TASK 6
- How many quadrilaterals?
- How many hexagons?
- What other polygons do you get? Tabulate what you found as follows:
| Number of sides | Which pentomino(es) | Total number |
|---|---|---|
| 4 | I | 1 |
| 6 | ||
- Are there any n-ominoes with an odd number of sides?
Teacher’s Note: The proof that all n-ominoes have an even number of sides is an interesting illustration of the use of proof by induction. We provide it below:
Proof by Induction
- For n = 1: monomino is a square which has an even number of sides
- Assume that for all n = 1, …, m, all possible n-ominoes have even numbers of sides
- We will show that when we create an (m + 1)-omino from m-omino by adding a square, the parity of the (m + 1)-omino and the m-omino does not change. In fact, the number of sides remains unchanged or changes by 2 or 4 only.
- Going from m-omino to (m + 1)-omino. We consider the different possibilities for the number of edges in common between the existing m-omino and the added square. This can be 1, 2, 3 or 4. We examine each case in turn. Note that in the case of contact with 2 edges, the two edges could be either adjacent to each other, or opposite to each other.
- Case A: 4 sides in common. This happens when there is a hole/island in the interior of the m-omino and the new square is inserted into the hole.

As the figure shows, the number of sides goes down by 4 and thus preserves its parity.
- Case B: 3 sides in common. Several subcases must be distinguished here, depending on the nature of the space in the m-omino where the new square has been attached. The middle side where contact is made must be 1 unit long, but the other two sides could be of different lengths. Both may be 1 unit long, or one may be 1 unit and the other may be more than 1 unit, or both may be more than 1 unit long.
As can be seen, the number of sides goes down by 4 and this preserves its parity.
The number of sides goes down by 2 and thus preserves its parity.
Here the number of sides remains the same and thus preserves its parity.
- Case C: 2 sides in common. As earlier, several subcases arise, depending on the lengths of the two sides where the new square has been attached. The two sides may both be 1 unit long, or one may be 1 unit and the other may be more than 1 unit, or both may be more than 1 unit long. Also, the two sides may be adjacent to each other or opposite each other.
The number of sides goes down by 2 and thus preserves its parity.
The number of sides remains the same and thus preserves its parity.
The number of sides goes up by 2 and thus preserves its parity.
Next, consider the cases where the edges of contact are opposite edges of the square. The same subcases arise: the two sides may both be 2 unit long, or one may be 2 unit and the other may be more than 2 unit, or both may be more than 2 unit long.
In each case the number of sides preserves its parity, as it changes by 0, 2 or 4.
- Case D: 1 side in common. Once again, several subcases arise, depending on the length of the side where the new square has been attached. The length may be 1 (if the new square has been attached at an end) or > 1 (if it is attached somewhere in the middle). As earlier the pictures shown below settle the issue.

This enumeration of cases proves the claim: the number of sides always changes by an even number (0, 2 or 4). As it is even at the start, it always remains even.
Closing Comments
Through this Low Floor High Ceiling activity we have tried to illustrate with the pentominoes (and polyominoes in general) how activities involving something basic (for example, counting) can build up to richer mathematics, through finding common patterns, hypothesizing and validating the same:
- Understanding area and perimeter and how they change with respect to each other (Tasks 4, 5);
- Identifying a variable and formulating an expression with it to calculate another variable (Task 4) – this is where a student beginning algebra can play with variables (independent and dependent) and create algebraic expressions and equations using them;
- Observing a pattern, formulating a hypothesis and proving it using induction (Task 6) – a powerful tool which students rarely get to see before the higher secondary stage.