Round and Round: Mathematics through Number Wheels


What are number wheels?
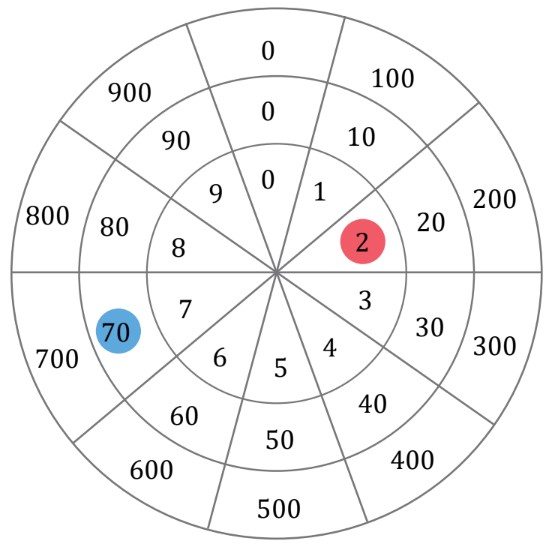
A number wheel is a simple tool shaped like a sequence of concentric discs, divided into sections, each containing a number. The innermost disc is called the units disc, which contains single digits from \(0-9\), the second disc is called the tens disc, which contains the multiples of \(10\), from \(0-90\), and so on (See Figure 1). The number wheels help us keep track of place values by moving across different discs. For example, the number \(27\) can be marked on the number wheel as follows: Since \(27 = 20 + 7 = 2\) tens and \(7\) units, we mark \(7\) in the units disc (marked red in Figure 1) and \(20\) in the tens disc (marked blue in Figure 1). Starting from position \(0\), each time we complete counting all the positions clockwise on one disc, we move one position forward on the next larger disc. In simpler terms, every time we complete a full circle on the units disc, we add \(10\) by moving one step clockwise on the tens disc, and this pattern continues for the other discs.

Using number wheels to practise elementary number operations
Let us begin with the addition of two double digits. To illustrate let us begin with finding the sum \(27 + 45\). The number wheels can be drawn on the floor, where the children ‘enact’ the addition of two numbers. Start by choosing three volunteers: name the first child “Unit,” the second child “Ten,” and the third child “Hundred.”
Step 1: We mark the number \(27\) on the number wheel by having the “Unit” stand at position \(7\) on the units disc, the “Ten” stand at position \(20\) on the tens disc, and the “Hundred” stand at position \(0\) on the hundreds disc. (See Figure 2)

Step 2: To add \(45\), we do the following: Since \(45 = 4\) tens and \(5\) units,
- First “Unit” moves \(5\) sections starting at \(7\) in the units disc and thus reaches position \(2\) in the units disc.
- Since “Unit” crossed the position \(0\) once, “Ten” moves from \(20\) to \(30\). This is the meaning of carrying over.
- Then we add \(4\) tens by moving \(4\) sections in the tens disc. Starting from where he is right now: from \(30\) to \(70\).
So the new positions are \(2\) in the units disc and \(70\) in the tens disc. Therefore \(27 + 45 = 72\) (Figure 3).
A quick set of exercises for the reader:
- Use the number wheel to compute the following sums:
- \(7 + 5\)
- \(7 + 15\)
- \(72 + 54\)
- In the example above we vaguely described the visual meaning of ‘carrying over’. Explain the meaning of this process.
- Extend the activity to explain the process of subtracting two double-digit numbers – in particular, the visual meaning of borrowing.
- Use the number wheel to compute the following differences:
- \(12 – 7\)
- \(48 – 39\)
- \(101 – 57\)
Variation 2: Separated wheels
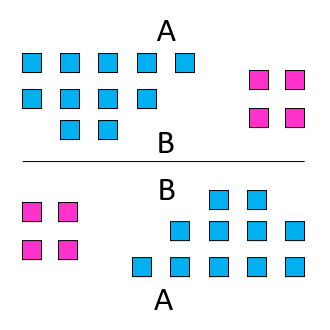
In this variation, the discs are separated and placed apart (see Figure 4). The unit disc is placed on the right, the tens disc in the middle, and the hundreds disc on the left. This setup helps emphasize the positional value of each digit, making it easier for students to connect the visual representation to numerical values.
This variation is especially useful for teaching the addition algorithm for two double digit numbers, as it allows the process to be demonstrated clearly and step by step. Note that here the tens and hundreds discs are marked from \(0\) to \(9\), this is a sophistication that must be explained to students (i.e., for example,\(5\) on the units disc is \(5\) , on the tens disc is \(50\) and on the hundreds disc is \(500\)).

Variation 3: An odometer
This variation, adapted from [1], involves building a physical model of an odometer, which is used to measure the distance a vehicle has travelled in kilometres.
Materials Needed:
- A piece of cardboard (\(6\)cm × \(2\)cm).
- Three paper strips (each \(1\)cm × \(11\)cm).
- Scissors, glue, and markers.
Steps to Create the Odometer: (See Figure 5.)
Step 1: Prepare the Cardboard Base
- Take the cardboard and divide it into three equal squares, each measuring \(2\)cm × \(2\)cm.
- Reading from right to left, assign each square to represent the units position, tens position, and hundreds position.
Step 2: Create the Digit Strips
- Cut three strips of paper, each measuring \(1\)cm × \(11\)cm.
- Divide each strip into \(11\) equal sections, each \(1\)cm × \(1\)cm.
- Label the sections with the digits \(0\) to \(9\) from top to bottom. Leave the last section blank.
Step 3: Insert the Digit Strips into the Cardboard
- In each of the three squares on the cardboard, cut a horizontal slit at the top and another at the bottom.
- Insert one digit strip through the top slit of each square and pull it out through the bottom slit.
- Roll each digit strip so that the blank section of the strip is pasted behind the ‘0’ section. This ensures that only one digit is visible at a time through the square window in the cardboard.
Step 4: Assemble the Odometer
- Once all the digit strips are inserted, you should be able to roll the strips to display numbers from \(000\) to \(999\) in the three squares.

Using the Odometer
This model can be used for activities similar to the ones with other variations, but this one aids better with individual activity. We could also provide the children with interesting word problems involving odometers, such as:
When you started at home, the odometer showed \(27\). You travelled \(45\) km to reach school. What should the odometer display when you arrive at school?
A few practical tips for using number wheels in a classroom
- Instead of asking children to draw number wheels in their notebooks or providing them with printouts, it can be more engaging to draw a large number wheel on the floor. Children can stand on the numbers and skip or jump to the next number as they perform the operations. Other students can watch and help by pointing out the correct numbers, turning the activity into a collaborative learning experience.
- Teachers should be ready to answer questions like, “Why do we always start at \(0\) instead of \(1\)?” or “What happens when we cross \(0\) on the tens disc?” These questions can help reinforce the concepts behind the number wheels and clarify how they work.
- Using dice can make the activity more fun. For example, you can roll a pair of dice to generate two double-digit numbers for addition or subtraction. However, keep in mind that standard dice won’t generate digits from \(7\) to \(9\), which could lead to discussions about other ways to create larger numbers.
- In a creative classroom, these activities can also lead to children coming up with their own algorithms to add numbers. These TLMs can also help children enact subtraction.
- Hall, D. E., & Hall, C. T. (1977). The odometer in the addition algorithm. The Arithmetic Teacher, 24(1), 18-21. Retrieved Jan 25, 2025, from https://doi.org/10.5951/AT.24.1.0018