Montessori Approach: (Part 1) An Introduction to Selected Materials and How to re-Create Them


The National Education Policy 2020 (NEP 2020) makes clear recommendations for education at all levels, starting with education for children of age 3 to higher education. Schooling has been divided into four stages based on the styles of learning best suited for those age groups — Foundational Stage for ages 3-8, Preparatory Stage for ages 8-11, Middle Stage for ages 11-14, and Secondary Stage for ages 14-18 (1).
The National Curriculum Framework for School Education (NCFSE, 2023) mentions that currently, a large proportion of students in the early grades are not achieving Foundational Literacy and Numeracy. Mathematics learning has traditionally been more ‘robotic’ and ‘procedural’ rather than creative and aesthetic. Students also tend to develop a sense of fear around the subject of Mathematics.
NCFSE 2023 suggests interactive teaching learning methods involving play, exploration, discovery, discussion, games, and puzzles to help counter this fear. The content suggested to achieve the Learning Standards is predominantly concrete play materials, such as toys, puzzles, picture books, and manipulatives during the first three years. Textbooks/ playbooks/ workbooks are recommended only from Grade 1. The pedagogy is largely play-based and emphasises nurturing, caring relationships between the teacher and the children. There should be a balance between self-paced individual learning and group activities. (2)
Among the various methods of early education that are predominantly followed in India and across the world, Montessori education, started by Dr. Maria Montessori is a century-old educational philosophy and practice, based on hands-on learning, self-paced and self-directed activities and collaborative play. In Montessori classrooms, children can make choices in their learning activities, with the environment and the teacher who is trained specifically in the Montessori ways ensuring age-appropriate activities are offered to the child to choose from. Children work individually and also do group activities, discovering and exploring the world around them, gaining knowledge and developing to their maximum potential.
These classrooms are well designed and thoroughly thought through to meet the specific needs of the child based on their age. Based on her experience of working with children directly, Dr. Maria Montessori discovered that experiential learning in such an environment led to a deeper understanding of mathematics, language, geography, science and a lot more. It helps develop and promote curiosity in a child and builds a strong foundation for lifelong learning. One can see that the overall vision for early education listed in NEP 2020 is achieved to a great extent in the Montessori method of education.
The Montessori Curriculum consists of five key areas of study: Practical Life, Sensorial, Mathematics, Language, and Culture. There is a set of Montessori materials for each area, focussing on a key knowledge or skill. In this article, we will look at some of the sensorial materials, specifically those that allow for visual discrimination (size, length, breadth, and width of objects). As you read through, you will realise that there’s so much more to them- mathematics, language, focus and a lot more that is intertwined! It will hopefully give a glimpse of what can be done in the class and what to expect as an outcome from it.
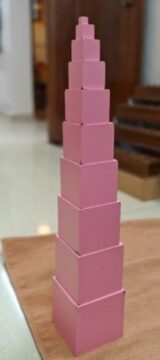
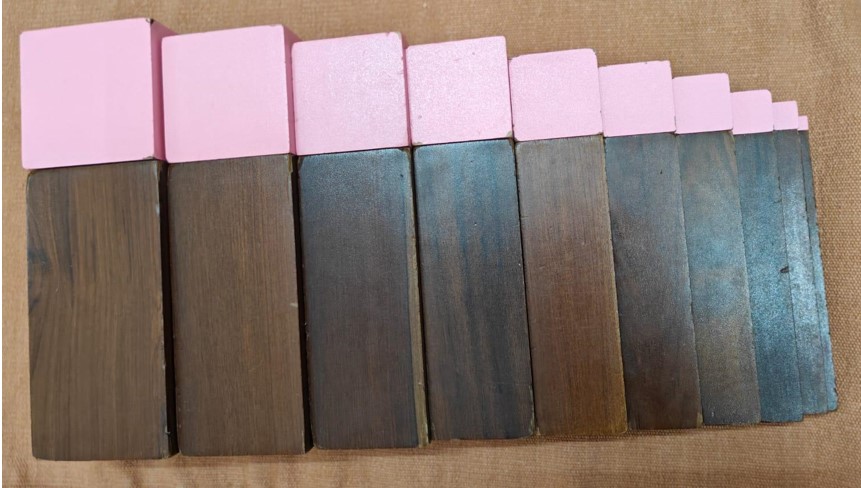
Material 1: Pink Tower
Pink tower is one of the initial materials given to children in the Montessori environment. It consists of 10 pink (no prizes for guessing!) cubes, of volume varying from 1000 cubic centimetres to 1 cubic centimetre, from the bottom to the top. It is typically introduced to children in the age group of 2 ½ to 3 years, to help develop a sense of dimension, and familiarise them with terms like “big” and “small” (and later to bring in the comparative and superlative degrees of bigger, biggest and smaller, smallest).
The child is asked to bring the cubes one at a time starting with the smallest cube (the top-most cube). Bringing one cube at a time allows them to, either consciously or subconsciously, realise that the cube size is increasing. Once all the cubes are placed on the mat, the child has to place the biggest cube in front of them. The teacher mixes up the rest of the cubes and then asks the child to place the next biggest cube. This goes on till they have placed all the cubes one above the other in decreasing order of size. As they do this, they are comparing as well as ordering similar objects by size.
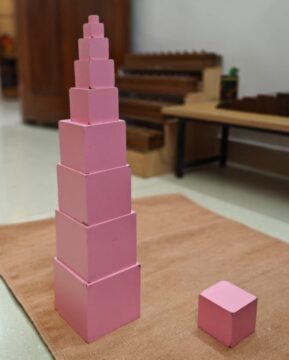
Other activities to try: Once they familiarise themselves with the material and are able to place the cubes correctly, there can be a few more activities that can be performed. One of them is for the teacher to pick out a cube at random without the knowledge of the child and ask the child to place it back on the tower correctly (Figure 2). This activity requires the child to notice where there is a sudden difference in the cube sizes within the tower and place the removed cube there, or compare the size of the removed cube with those on the tower and find its correct position, which is above the cube that is bigger than and below the cube that is smaller than this one.
Another activity is to mix up all the cubes in a tray and ask the child to bring one cube at a time, starting from the biggest to the smallest, to form the tower on the mat. Each time the child will have to look for the biggest cube among what is left on the tray. This may also be a good time for the teacher to introduce comparative and superlative degrees. Place two cubes on the mat and ask, “Which cube is bigger?”, “Which one is smaller?” After repeating this a few times, place any three cubes on the mat and ask, “Which one is the biggest?”, “Which cube is the smallest?” The teacher continues till the child is familiar with the idea and meaning of these words.
In another activity, the teacher makes 10 square cards, each card matching the face of each of the cubes and then asks the child to match the card to its respective cube.
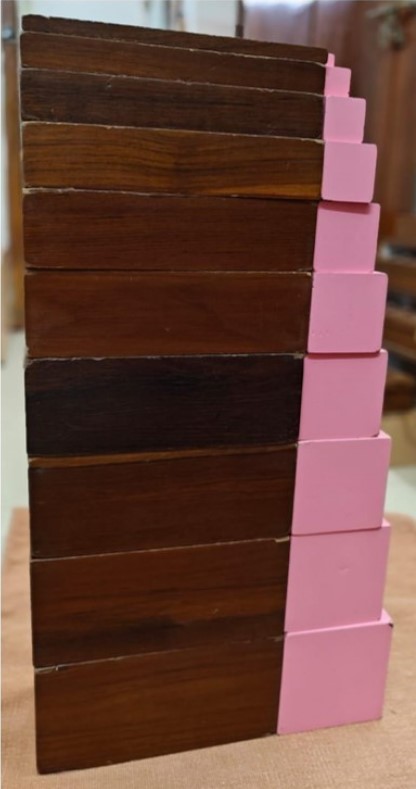
Material 2: Brown stairs
Brown stairs is a material that is introduced around the same time as pink tower (between 2 ½ and 3 years of age).
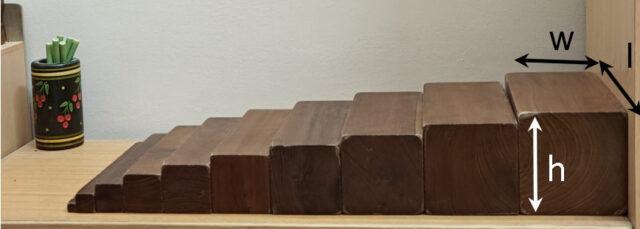
It consists of brown cuboids each of the same length (l) but varying in width (w) and height (h) (and so its thickness), thus providing the effect of stairs (Figure 3).
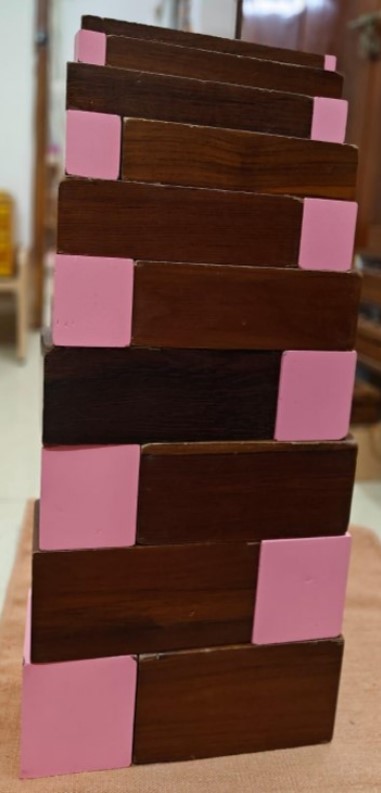
The same set of activities that are performed with pink tower can be done with brown stairs too. T he vocabulary that children are introduced to are thick, thicker, thickest, thin, thinner, and thinnest. An interesting point to note is that the faces of the pink tower cubes match the faces of the brown stairs cuboids! As children continue to explore these two materials, this realisation dawns on them automatically! There are multiple arrangements of these two materials that children can make, and in the process learn so much about patterns, balance, and focus.
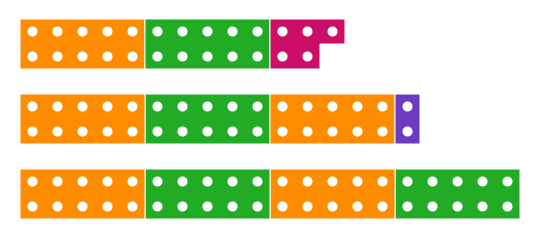
Material 3: Long Rods
This material consists of 10 rods, all of the same thickness but varying in lengths, to help children get the idea of length and build vocabulary around “long” and “short” (Figure 7). The familiarity with this material allows them to understand “Number rods” going forward. The child is asked to place one rod at a time on the mat, starting from the longest to the shortest. T he teacher allows them to observe how the length of the rod decreases as one moves from left to right. The vocabulary of longer, longest and shorter, shortest is introduced by placing a pair of rods separately and asking for the longer rod, or placing three rods and asking for the shortest and so on.
Other activities to try: Additional activities can include jumbling the rods and asking the child to arrange them in order, removing a rod from the arrangement and asking the child to place it correctly, or getting the child to arrange pairs of rods that are equal in length to the longest rod (or any rod of a chosen length) (Figure 8).


Material 4: Number rods
Number rods are typically introduced to children in the age group of \(3\) 1/2 to \(4\)1/2 years, after continuous repeated work with pink tower, brown stairs, and long rods. Children would have sensorially experienced the qualities such as big/small, long/short and are now beginning to wonder “by how much” something is longer or shorter. This is when they are ready to understand quantity. There is a mathematical awakening of the mind that is happening.
Number rods are similar to long rods in dimension, but with two colours (typically red and blue) on the rods (except for the rod of length 1) (Figure 9).
The child arranges the rods from the longest to the shortest, starting from the left and ensuring that the red side of the rod is at the bottom each time. In this activity the teacher calls out each rod by its name as it is being placed- rod of 10, rod of 9 and so on. The child eventually observes that the rod of 2 is twice the length of rod of 1, the rod of 3 is thrice the length of rod of 1 (or rod of 1 taken three times), and so on.

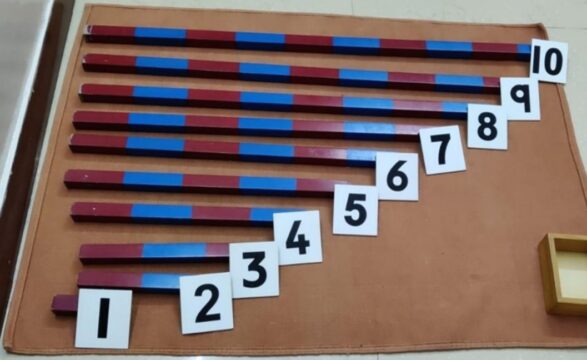
Other activities to try: The teacher makes number cards from 1 to 10. They are mixed up and the child is asked to place each card against the correct rod, after counting the length of the rod. This activity tests for the association of the quantity (number on the rod) with its symbol (Figure 10). Once they are comfortable doing this, the teacher mixes the number cards as well as the rods. The child is asked to pick a rod, identify it and place the right number card against it. Since the rods are not in order, memorisation of the number sequence will not help the child in this activity! Another activity is to find a pair of rods that add up to 10 (length of rod of 10). They may pick 9 and 1, or 8 and 2, or 7 and 3, or 6 and 4.
Notice that the same activity was performed with long rods, without associating the quantity with the rods. Here they are expected to say the number names of the rod pairs. To make it more challenging the teacher may pick a random rod and ask them to find pairs of rods. And just like that, they are being introduced to some Addition Facts! Interestingly, this material initiates a number line using a continuum. Most other materials including the Ganitmala are discrete. The fact that each numerical symbol can be matched to a quantity in the form of a single object makes the association between the numerical symbol and the quantity clear and easy (Montessori, M., 2016). A detailed description of the various additional activities for each material can be accessed at (3).
Thus, there are 3 series of objects, the pink tower, the brown stairs, and the long rods which are made in such a way to define and isolate in each series, the possibilities in differences in 3 dimensions. These objects prepared in a series of successive dimensions, help to prepare and build up the mathematical mind of the child sensorially. This develops in the child a certain kind of reasoning, ability to judge quantity which composes the mathematical mind (Montessori, M., 2007).
Are you excited to try these materials in class? Well, although Montessori materials may seem appealing to incorporate, as you may have rightly guessed, there are several limitations to using them fully in a classroom setting. Firstly, the entire philosophy of Montessori education is imparted through a formal training program designed for teachers. Without this training, it may be challenging to implement the comprehensive approach envisioned by Dr. Maria Montessori. Nevertheless, one can strive to utilise these materials to the best of one’s ability and share this experience with as many children as feasible. However, it’s important to acknowledge that even with this intention, limitations still exist.
Montessori materials, though fantastic tools for discovery and learning, tend to be quite expensive. Additionally, they are challenging to replicate due to the importance of precision; even slight variations in dimensions can significantly affect their intended use. Typically, Montessori materials are crafted from natural materials such as wood, metal, or fabric, with those examined in this article being primarily wooden.
With the objective of making some of the materials affordable and easily accessible, Math Space at Azim Premji University has developed an innovative and efficient method for producing low-cost Montessori materials that maintain precision, enabling interested teachers to create and utilise these resources in their classrooms effectively. Here are some simple steps to make them yourself!
- Make nets of cubes or cuboids (using thick chart paper or ivory sheets) of the desired dimensions to ensure precision
- Fill the space within the net with square (for cubes) or rectangular (for cuboids) corrugated cardboard sheets to make it solid
- Tape the entire solid to make it water-proof
- Voila! Your Montessori material is ready
Open box: glue/tape green flaps

Cardboard stuffing
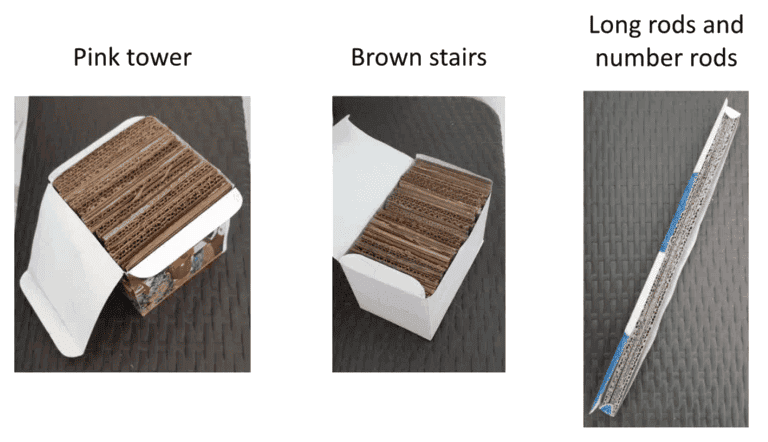


The step-by-step process to create these materials, and the dimensions required can be accessed at (6). Note that the original Montessori brown stairs are made of length 20 cm each, while the nets used here are of length 15 cm. Nevertheless, this difference in length does not affect the usability or effectiveness of the material.
Embracing the principles of the Montessori method and making it accessible through low cost materials could help democratise quality education for all children. By focusing on the natural development of each child, we can nurture well-rounded individuals who are not only equipped with essential knowledge but also possess the confidence and skills necessary to navigate the complexities of the world. Ultimately, the Montessori method is more than a pedagogical technique; it is a philosophy that champions the unique potential of each child, paving the way for a brighter and more inclusive future in education.
Acknowledgement:
This article has been compiled with inputs from Ms. Sudha Rao, Parijatha Montessori and Swati Sircar, Azim Premji University.
- National Curriculum Framework for School Education (2023), Page 20.
- NCFSE (2023), https://www.ncert.nic.in/pdf/NCFSE-2023-August_2023.pdf
- Activities with Pink Tower, Brown Stairs, Long Rods and Number Rods https://bit.ly/3YcXg6S
- Montessori, M. (2016). Psychoarithmetic (Vol. 20, p. 6). Montessori Pierson Publishing Company.
- Montessor, M. (2007) Creative Development in the Child (Vol. 1). Kalakshetra Press.
- How to make low cost Pink Tower, Brown Stairs, Long Rods and Number Rods https://bit.ly/4eJhR8